Side Dishes

Ultimate Yaylabs Ice Cream Ball Recipe Guide for Beginners

Ultimate Yaylabs Ice Cream Ball Recipe Guide for Beginners

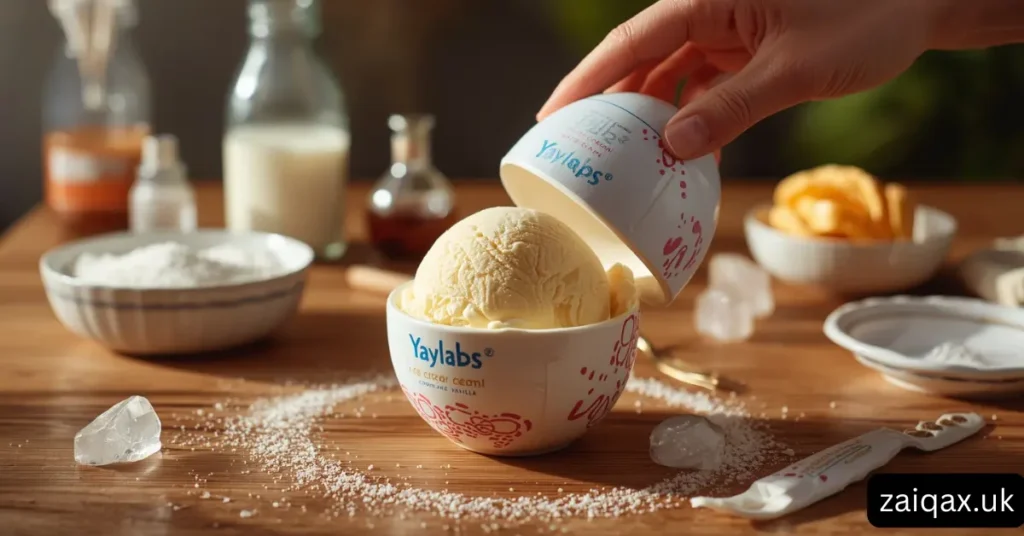
Making homemade ice cream sounds complicated to many beginners, but it doesn’t have to be. With a Yaylabs Ice Cream Ball, the process becomes fun, simple, and surprisingly quick. Instead of using a bulky machine, you just shake, roll, and enjoy. This guide will walk you through everything you need to know — from ingredients and techniques to troubleshooting and creative variations. Whether you’re trying homemade ice cream for the first time or just want a foolproof method, this beginner-friendly guide will help you succeed. What Is a Yaylabs Ice Cream Ball? The Yaylabs Ice Cream Ball is a clever kitchen gadget designed to make ice cream without electricity. It’s a ball-shaped container with two separate chambers: Inner chamber → Holds your ice cream mixture Outer chamber → Holds ice and rock salt When you shake or roll the ball, the ice and salt create a freezing habit that churns your mixture into smooth, creamy ice cream. Unlike traditional machines, this method is:  Portable Kid-friendly No power required Great for outdoor activities Why Beginners Love This Ice Cream Method Many people feel awed by ice cream makers because they require setup, freezing bowls, and technical steps. The ice cream ball removes those barriers. Beginner Advantages No complicated equipment You don’t need motors, pre-frozen bowls, or attachments. Easy to understand If you can mix ingredients and shake a ball, you can make ice cream. Quick learning curve Most beginners get great results on their first attempt. Interactive and fun Perfect for families, picnics, and parties. How the Ice Cream Ball Actually Works Understanding the science helps beginners avoid mistakes. Ice cream forms when: Your mixture gets cold enough to freeze It is continuously agitated Ice crystals remain small The rock salt lowers the freezing point of ice, creating temperatures cold enough to freeze the mixture. The movement from shaking prevents large ice crystals, giving you creamy texture instead of icy chunks. Essential Ingredients for Success Beginners often assume homemade ice cream requires exotic ingredients. In reality, the basics are simple. Standard Base Ingredients Heavy cream or whipping cream Milk Sugar Vanilla extract Ice Rock salt That’s it. From this foundation, you can create countless flavors. Ultimate Beginner Ice Cream Ball Recipe This recipe is designed for reliability and smooth texture — ideal for first-time users. Ingredients Ice Cream Mixture 1 cup heavy cream 1 cup milk ⅓ to ½ cup sugar (adjust to taste) 1 teaspoon vanilla extract Freezing Chamber Ice cubes (enough to fill outer chamber) Rock salt (about ½ cup) Step-by-Step Instructions Step 1: Prepare the Ice Cream Mixture In a bowl, combine: Cream Milk Sugar Vanilla Whisk until sugar fully dissolves. Beginners often skip proper mixing, which can lead to grainy texture. Beginner Tip: If sugar crystals remain visible, keep whisking. Step 2: Fill the Inner Chamber Carefully pour the mixture into the inner container.  Do not overfill Leave some space for expansion Secure the lid tightly to avoid leaks. Step 3: Add Ice and Rock Salt Fill the outer chamber with ice, then sprinkle rock salt evenly. Why Salt Matters: Salt makes the ice colder, which freezes the mixture faster. Step 4: Start Shaking or Rolling Now comes the fun part. You can: Shake the ball Roll it on the ground Toss gently between friends Continue for about 15–25 minutes. Step 5: Check Consistency Open the inner chamber carefully. If mixture looks soft → Shake longer If thick and creamy → Ready to enjoy How Long Does It Take? Beginners frequently worry about timing. Exact freezing time varies based on: Ice quantity Salt ratio Outdoor temperature Shaking intensity Typical Range: 15–25 minutes Hot weather may require extra shaking. Texture Expectations for Beginners Your first batch may not look like store-bought ice cream — and that’s normal. Possible beginner results:  Soft-serve texture (very common) Slightly airy consistency Rich, creamy mouthfeel If too soft, simply freeze briefly. Common Beginner Mistakes (And Fixes) 1. Ice Cream Too Runny Cause: Not enough shaking or salt Fix: Add more ice + salt, continue shaking 2. Ice Cream Too Hard Cause: Excessive freezing Fix: Let sit for a few minutes before scooping 3. Leaking Chambers Cause: Loose lid or damaged seal Fix: Always double-check tightness 4. Grainy Texture Cause: Undissolved sugar Fix: Mix longer before freezing Perfect Salt-to-Ice Ratio Beginners often underestimate salt importance. Good Starting Point: Fill chamber with ice Add roughly ½ cup rock salt Too little salt → Slow freezing Too much salt → No major harm, just faster freezing Flavor Variations for Beginners Once you master vanilla, the real creativity begins. Chocolate Ice Cream Add to base mixture: 2 tablespoons cocoa powder Extra sugar if needed Whisk thoroughly to avoid lumps. Strawberry Ice Cream Add: ½ cup mashed strawberries Fresh fruit adds flavor but may soften texture slightly. Cookies and Cream After freezing: Stir crushed chocolate cookies Adding solids early may interfere with churning. Mango Ice Cream Popular among beginners: Blend ripe mango Add ½ cup puree to mixture Natural sweetness may reduce sugar needs. Healthier Beginner Options Homemade ice cream allows ingredient control. Lower Sugar Version Replace sugar with: Honey Maple syrup Sugar substitutes Expect a slightly softer texture. Light Cream Option Use: More milk Less cream Results will be less rich but still enjoyable. Making Ice Cream With Kids One reason beginners love this method is its playful nature. Children can help by:  Rolling the ball Timing the process Suggesting flavors Always supervise salt handling. Outdoor Ice Cream Fun Ideas The portability of the ice cream ball makes it perfect for: Picnics Camping Backyard gatherings Birthday parties It becomes both dessert and activity. Cleaning and Maintenance Tips Proper care ensures long-term performance. Cleaning Steps Rinse chambers immediately Use mild soap Avoid harsh scrubbers Dry completely before storage Residual dairy odors can develop if left uncleaned. Storage Tips for Ingredients Beginners sometimes forget preparation matters. Keep cream chilled  Use fresh ice  Store rock salt dry Cold ingredients freeze faster. Advanced Beginner Tricks Once comfortable, try improving efficiency.

Ultimate Yaylabs Ice Cream Ball Recipe Guide for Beginners Read More »

The Secret to Using Yeast Extracts for Savoury Flavor Recipes

The Secret to Using Yeast Extracts for Savoury Flavor Recipes

If you’ve ever wondered how some dishes have that irresistible, rich, umami-packed taste, the secret often lies in yeast extracts. These ingredients have become a kitchen staple for home cooks and professional chefs alike, offering a natural way to elevate flavors without adding extra salt or artificial additives. In this guide, we’ll explore everything you need to know about using yeast extracts for savoury flavor recipes—from what they are to practical cooking tips and recipe ideas. What Are Yeast Extracts? Yeast extracts are natural ingredients derived from yeast cells, most commonly from baker’s yeast or brewer’s yeast. During the production process, yeast cells are broken down to release amino acids, vitamins, and minerals. This creates a concentrated paste or powder that is rich in umami, which is the savory taste often described as the “fifth taste,” alongside sweet, sour, salty, and bitter. Unlike artificial flavor enhancers, yeast extracts are naturally occurring and can add depth and richness to dishes without relying on high levels of salt or sugar. They are commonly used in soups, sauces, gravies, marinades, and even vegetarian or vegan recipes where traditional meat-based flavors are missing. Why Yeast Extracts Enhance Savoury Flavors The magic of yeast extracts lies in glutamates, naturally occurring compounds that stimulate the taste receptors on your tongue. These compounds give foods a meaty, savory depth that makes simple ingredients taste more complex. Some key benefits of using yeast extracts include: Umami Boost – Intensifies flavor naturally. Reduced Salt Requirement – Helps cut down on sodium while keeping food flavorful. Vegetarian-Friendly – Adds meaty flavor without animal products. Versatility – Works in a variety of dishes, from stews to spreads. By understanding these benefits, home cooks can unlock a new level of flavor in everyday meals. Types of Yeast Extracts Not all yeast extracts are the same. Choosing the right type can make a big difference in your recipes. The most common forms include: Paste – Thick and concentrated, ideal for spreading on toast or blending into sauces. Powder – Easy to sprinkle or mix into dry rubs, soups, and seasoning blends. Liquid – Convenient for adding directly to soups, gravies, or marinades. Each type has its own advantages, and experimenting with different forms can help you find the best way to incorporate yeast extracts into your cooking. How to Use Yeast Extracts in Cooking The key to using yeast extracts successfully is balance. Too much can make a dish overly strong or bitter, while too little might not create the desired umami effect. Here are some practical tips: 1. Start Small A little yeast extract goes a long way. Begin with a teaspoon or less for soups, sauces, and gravies. Taste as you go, and adjust gradually. 2. Pair With Other Flavors Yeast extracts work best when combined with complementary ingredients like garlic, onion, mushrooms, soy sauce, or tomato paste. These flavors naturally enhance the umami effect. 3. Incorporate Into Marinades Marinades for vegetables, tofu, or meats can benefit from a teaspoon of yeast extract. It adds depth that penetrates the ingredients during cooking, enhancing flavor naturally. 4. Mix Into Soups and Stews Yeast extracts dissolve easily in hot liquids, making them perfect for enriching soups, stews, and broths. Add toward the end of cooking to preserve maximum flavor. 5. Use as a Spread Yeast extract pastes are popular as spreads on toast or crackers, often paired with butter, avocado, or cheese. This is a simple way to enjoy the savory taste without cooking. Yeast Extracts in Vegetarian and Vegan Cooking One of the biggest advantages of yeast extracts is that they are plant-based. In vegetarian and vegan cooking, they are a game-changer for creating depth in dishes that traditionally rely on meat. Soups and Broths: A teaspoon of yeast extract can transform a simple vegetable broth into a rich, satisfying soup. Vegan Cheeses: Yeast extract adds cheesy, nutty flavor to plant-based cheese sauces. Meat Alternatives: Enhance tofu, tempeh, and seitan with yeast extract to mimic savory, meaty notes. By integrating yeast extracts thoughtfully, plant-based dishes can reach flavor levels often reserved for meat-based recipes. Common Recipes Using Yeast Extracts Here are some practical ways to use yeast extracts in your kitchen: Savory Mushroom Soup – Boost the umami flavor of mushrooms with a teaspoon of yeast extract. Vegetable Stir-Fry – Add powder to your sauce for a richer taste without soy sauce overload. Mashed Potatoes – Stir in a small amount of paste for creamy, deeply flavorful potatoes. Homemade Gravy – Perfect for vegetarian gravies; yeast extract adds that meaty punch. Nutty Spread – Mix paste with butter or plant-based alternatives for toast toppings. Experimentation is key. Adjusting amounts and combinations allows you to discover your preferred flavor balance. Tips for Storing and Handling Yeast Extracts Yeast extracts are generally long-lasting if stored correctly. Here are some storage tips: Keep Paste and Liquid in the Fridge – Helps maintain freshness and prevent spoilage. Store Powder in a Cool, Dry Place – Avoid moisture, which can cause clumping. Seal Tightly After Each Use – Limits air exposure and preserves flavor. By following these simple tips, yeast extracts can remain a reliable pantry staple for months. Mistakes to Avoid When Using Yeast Extracts Even though yeast extracts are versatile, misuse can lead to disappointing results. Here’s what to watch out for: Using Too Much – Can overpower other flavors and create bitterness. Adding Early in Cooking – Some types lose flavor if boiled for too long; add near the end. Ignoring Complementary Ingredients – Pairing with onions, garlic, or tomatoes enhances the natural umami. Being mindful of these common mistakes will ensure your dishes are always rich and balanced. Health Considerations Yeast extracts are generally safe for most people. However, there are a few considerations: Sodium Content – Some commercial yeast extracts contain added salt. Check labels if you are monitoring sodium intake. Glutamate Sensitivity – While naturally occurring glutamates are safe, individuals sensitive to MSG may need to consume in moderation. Allergies

The Secret to Using Yeast Extracts for Savoury Flavor Recipes Read More »

The Best Yellowtail Crudo Recipe Every Seafood Lover Must Try

The Best Yellowtail Crudo Recipe Every Seafood Lover Must Try

If you are a seafood enthusiast, nothing excites the palate quite like a perfectly prepared crudo. Among the myriad of seafood dishes, yellowtail crudo stands out for its delicate texture, fresh flavor, and simple elegance. This article will guide you through everything you need to know about creating the best yellowtail crudo recipe that every seafood lover must try. From selecting the freshest fish to the finishing touches that elevate this dish, we’ve got you covered. What is Yellowtail Crudo? Yellowtail crudo is an Italian-inspired dish that emphasizes the natural flavors of raw yellowtail fish. “Crudo” means “raw” in Italian, and it is similar to sashimi or ceviche but often features a unique combination of citrus, herbs, and olive oil. Unlike cooked seafood, crudo highlights the delicate, buttery texture of the fish, making it a favorite for those who appreciate light and fresh dishes. This dish is not just a treat for the taste buds but also a feast for the eyes. The presentation is as important as the flavor, with vibrant garnishes, thinly sliced fish, and a drizzle of bright, aromatic oils. Why Yellowtail is Perfect for Crudo Yellowtail, also known as Hamachi, is a type of fish prized for its rich, buttery flavor and firm yet tender texture. Here’s why it’s ideal for crudo: Flavor: Yellowtail has a subtle sweetness that pairs beautifully with citrus and herbs. Texture: Its firm, silky texture holds up well when sliced thinly for crudo. Freshness: When served raw, the natural flavor of yellowtail shines through, making it a standout ingredient. Versatility: It pairs well with a variety of seasonings, from simple olive oil and sea salt to bold Asian-inspired sauces. Selecting the Best Yellowtail for Crudo The first step to the best yellowtail crudo is choosing the right fish. Freshness is crucial because the fish is served raw. Here are tips for selecting high-quality yellowtail: Appearance: Look for bright, translucent flesh with no discoloration. Avoid any yellowtail that appears dull or brownish. Smell: Fresh yellowtail should smell like the sea—clean and slightly briny. Avoid fish that has a strong, fishy odor. Texture: The flesh should be firm to the touch. Avoid fish that feels mushy or slimy. Sourcing: Buy from a trusted fishmonger or seafood market, preferably one that sells sashimi-grade fish. Ingredients You Will Need Creating the best yellowtail crudo requires just a few high-quality ingredients. Here’s what you’ll need: 8 ounces of fresh yellowtail fillet, sashimi-grade 2 tablespoons extra-virgin olive oil Juice of 1 lemon or yuzu (or a combination for a citrusy punch) 1 teaspoon sea salt 1 teaspoon freshly ground black pepper Microgreens or fresh herbs for garnish (optional) Thinly sliced radishes or cucumber for crunch (optional) Chili flakes or thinly sliced chili for heat (optional) These simple ingredients allow the natural flavor of the yellowtail to shine while adding layers of freshness, brightness, and texture. Step-by-Step Guide to Making Yellowtail Crudo Making yellowtail crudo is surprisingly simple, but precision matters. Here’s a step-by-step guide to creating this elegant dish: 1. Prepare the Fish Start by ensuring your yellowtail fillet is well-chilled. Using a very sharp knife, slice the fish into thin, uniform pieces, about ¼ inch thick. Thin slices allow the citrus and oil to lightly “cook” the fish while maintaining its tender texture. 2. Citrus Marinade In a small bowl, combine fresh lemon or yuzu juice with olive oil. The citrus will gently marinate the fish, enhancing its flavor without overpowering it. 3. Season the Fish Arrange the yellowtail slices on a serving platter. Drizzle with the citrus and olive oil mixture, then sprinkle with sea salt and black pepper. These simple seasonings highlight the fish’s natural flavor. 4. Add Garnishes Top your crudo with microgreens, thinly sliced radishes, cucumber, or a few chili flakes. These garnishes add color, crunch, and subtle complexity to the dish. 5. Serve Immediately Yellowtail crudo should be served immediately after preparation. Freshness is key—don’t let the fish sit in the marinade for too long, or it may start to lose its delicate texture. Tips for Perfect Yellowtail Crudo Even a simple dish like yellowtail crudo benefits from expert tips: Keep it Cold: Serve the fish on a chilled platter or plate to maintain freshness. Use High-Quality Olive Oil: A fruity, high-quality olive oil enhances the flavor of the fish. Balance Acidity: Too much citrus can overpower the fish, so drizzle lightly. Experiment with Herbs: Basil, cilantro, or shiso leaves can add unique flavor notes. Mind the Slicing: Thin, even slices ensure each bite is tender and flavorful. Flavor Variations to Try While the classic lemon and olive oil preparation is delicious, you can explore other flavor combinations: Asian-Inspired: Add a splash of soy sauce, sesame oil, and thinly sliced scallions. Spicy Citrus: Mix lemon or yuzu juice with a hint of chili oil or red pepper flakes. Herbaceous Twist: Combine olive oil with finely chopped basil, mint, or tarragon. Citrus Medley: Use a combination of blood orange, lime, and lemon juice for a bright, tangy flavor. Experimenting with flavors allows you to create a personalized version of this dish while keeping the focus on the delicate yellowtail. Pairing Yellowtail Crudo with Drinks Yellowtail crudo pairs beautifully with light, crisp beverages. Consider these options: White Wine: A dry Sauvignon Blanc or Pinot Grigio complements the fish’s freshness. Sparkling Wine: Champagne or Prosecco adds a celebratory touch. Sake: A cold, dry sake enhances the subtle umami of yellowtail. Cocktails: Light, citrus-forward cocktails, such as a gin and tonic with lemon, work well. These pairings elevate the dining experience, making yellowtail crudo perfect for entertaining or a special meal at home. Health Benefits of Yellowtail Crudo Not only is yellowtail crudo delicious, but it also offers several health benefits: High in Protein: Yellowtail is a great source of lean protein, supporting muscle health. Rich in Omega-3 Fatty Acids: These healthy fats promote heart health and brain function. Low in Calories: A light dish that’s perfect for those watching their calorie intake. Packed

The Best Yellowtail Crudo Recipe Every Seafood Lover Must Try Read More »

Homemade Yemenite Soup Recipe With Rich Broth

Homemade Yemenite Soup Recipe With Rich Broth

Yemenite soup is one of those deeply comforting dishes that feels both nourishing and flavorful at the same time. Known for its fragrant spices, golden broth, and slow-simmered goodness, this traditional soup has become beloved far beyond its place of origin. If you are searching for a homemade Yemenite soup recipe with rich broth, you are in the right place. This guide will walk you through everything — from ingredients and cooking techniques to flavor secrets and common mistakes — in a simple, easy-to-follow way. Whether you are new to Yemenite cooking or already a fan of Middle Eastern soups, you will find practical tips to help you create a truly satisfying bowl of soup at home. What Is Yemenite Soup? Yemenite soup is a traditional dish associated with Yemenite Jewish cuisine, but it has become widely popular in many parts of the world. The soup is famous for its aromatic spice blend, typically featuring turmeric, cumin, black pepper, and the distinctive hawaij spice mix. Unlike many light broths, Yemenite soup is valued for its deep, rich broth that develops through slow cooking. It is commonly prepared with beef or chicken, along with vegetables such as potatoes, carrots, onions, and sometimes squash or celery. What makes this soup special is the balance between warmth, spice, and comfort. It is not overwhelmingly hot or spicy, but gently fragrant and incredibly soothing. Why This Homemade Yemenite Soup Recipe Stands Out Many people try Yemenite soup in restaurants but struggle to recreate that same rich taste at home. The secret lies not only in the spices but also in technique. This recipe focuses on: Building a naturally rich broth Extracting maximum flavor from bones and meat Proper spice usage Slow simmering for depth Balanced seasoning By understanding these elements, you can consistently make a flavorful Yemenite soup that tastes authentic and satisfying. Key Ingredients for Yemenite Soup Before cooking, it is important to understand the purpose of each ingredient. Yemenite soup is simple, but every component gives to the final flavor. 1. Meat (Beef or Chicken) Traditionally, beef is used for a heartier soup, while chicken offers a lighter variation. Beef with bones is especially good for achieving a rich broth. Best beef cuts for Yemenite soup: Beef shank Short ribs Bone-in stew meat Neck bones For chicken soup: Whole chicken pieces Chicken thighs Bone-in chicken Bones are essential for depth and body in the broth. 2. Hawaij Spice Blend Hawaij is the signature seasoning of Yemenite soup. It typically contains: Turmeric Cumin Black pepper Cardamom Some variations include coriander or cloves. This spice blend gives the soup its golden color and warm aroma. 3. Onions Onions provide sweetness and foundational flavor. They slowly break down during cooking and enrich the broth naturally. 4. Garlic Garlic adds warmth and savory depth. It works beautifully with turmeric and cumin. 5. Vegetables Classic vegetables include: Potatoes Carrots Celery Zucchini or squash Vegetables absorb the spices and help balance the richness of the broth. 6. Fresh Herbs (Optional) Some cooks add cilantro or parsley for freshness. 7. Salt and Pepper Seasoning is critical. Under-seasoned Yemenite soup will taste flat anyway of spices. The Secret to a Rich Yemenite Soup Broth Many people assume the spices alone create richness, but the broth is actually built through slow extraction of flavor from meat and bones. To achieve a deeply satisfying broth: Use bone-in meat Cook slowly, never rushing the simmer Avoid boiling aggressively Skim impurities for clarity Season gradually A rushed soup will lack depth. Homemade Yemenite Soup Recipe With Rich Broth Let’s move step-by-step through the cooking process. Ingredients 700–900 g beef (bone-in preferred) or chicken 2 large onions, chopped 4 cloves garlic, minced 2 carrots, sliced 2–3 potatoes, cubed 2 celery stalks, chopped 1 zucchini or squash (optional) 1½ tablespoons hawaij spice blend 1 teaspoon ground black pepper Salt to taste 2 tablespoons oil 2.5–3 liters water Fresh cilantro or parsley (optional) Step 1: Sauté the Aromatics Heat oil in a large pot over medium heat. Add onions and cook slowly until soft and slightly golden. This step builds flavor, so do not rush. Properly cooked onions add natural sweetness and body. Add garlic and stir briefly. Step 2: Add Spices Sprinkle the hawaij spice blend into the pot. Stir gently to release the aromas. Cooking spices in oil enhances their flavor dramatically. You will notice the color deepen — this is exactly what you want. Step 3: Add Meat Place the meat into the pot and coat it with the onion and spice mixture. Light browning is beneficial but not required. Step 4: Add Water Pour in water and increase heat until the soup begins to simmer. Avoid strong boiling. Step 5: Skim the Surface As the soup heats, foam or impurities may appear. Skim gently using a spoon. This improves both clarity and taste. Step 6: Slow Simmering Reduce heat to low and let the soup simmer gently for at least 60–90 minutes (longer for beef). Slow cooking extracts collagen and flavor, creating a rich broth. Step 7: Add Vegetables Add potatoes, carrots, celery, and other vegetables. Continue simmering until vegetables are tender. Step 8: Seasoning Add salt gradually. Taste and adjust. Proper seasoning transforms the soup. Step 9: Final Touch Add fresh herbs if desired. Serve hot. Flavor Variations for Yemenite Soup One of the joys of Yemenite soup is its flexibility. Chicken Yemenite Soup Swap beef for bone-in chicken. Cooking time reduces slightly, but the spice profile remains wonderful. Vegetarian Yemenite Soup Replace meat with: Chickpeas Lentils Root vegetables Use a slow simmer and slightly increase spices for depth. Spicier Version Add: Extra black pepper Chili flakes Fresh chili Extra Rich Broth For deeper richness: Add marrow bones Extend simmering time Allow soup to rest before serving Common Mistakes to Avoid 1. Boiling Too Hard Aggressive boiling makes broth cloudy and can toughen meat. 2. Insufficient Simmering Time Flavor needs time to develop. 3. Under-Seasoning Spices do not replace salt. 4.

Homemade Yemenite Soup Recipe With Rich Broth Read More »

Best YPD Media Recipe Tips Every Creator Must Try About

Best YPD Media Recipe Tips Every Creator Must Try About

In the fast-evolving world of digital media, creators are constantly seeking ways to produce content that is not only engaging but also stands out in an ever-crowded digital space. One of the most effective ways to achieve this is through the strategic use of YPD Media recipes—a framework that blends vision, strategy, and technology to enhance content impact. Whether you are a seasoned content creator, a social media influencer, or someone just starting their journey in digital media, implementing these Best YPD Media Recipe Tips can significantly elevate your content game. In this article, we will break down everything you need to know—from foundational principles to advanced tips—so you can master the art of creating content that resonates and converts. Understanding YPD Media Recipes Before diving into the tips, it’s crucial to understand what a YPD Media recipe is. In essence, YPD Media recipes are structured viewpoints to content creation that ensure every piece of content serves a purpose. These recipes combine storytelling, visual aesthetics, platform-specific strategies, and audience engagement techniques into a cohesive formula. Think of it as a recipe in cooking: just like combining the right ingredients in the right way produces a delicious dish, following a media recipe ensures your content hits all the right notes—reach, engagement, and conversion. Key Components of a YPD Media Recipe Content Objective: What do you want your audience to feel, learn, or do after consuming your content? Target Audience Analysis: Understanding demographics, interests, and behavior patterns. Platform Optimization: Each platform has its own best practices, from Instagram reels to YouTube videos. Visual Storytelling: Using imagery, graphics, and layout strategically. Engagement Hooks: Calls to action, questions, and interactive elements. Performance Tracking: Measuring success using analytics and refining your approach. By mastering these components, creators can consistently produce content that performs well and resonates deeply with their audience. Best YPD Media Recipe Tips Every Creator Must Try Here’s a curated list of actionable tips that every content creator should try to maximize their success YPD Media recipes. 1. Start With a Clear Goal The foundation of any successful media recipe is a well-defined goal. Ask yourself: Are you aiming to build brand awareness? Increase engagement? Drive sales or conversions? Without a clear goal, even the most creative content can fail to produce tangible results. Make it specific, measurable, achievable, relevant, and time-bound (SMART). Example: Instead of saying “I want more followers,” try “I want to increase Instagram followers by 15% in the next two months through weekly creative content posts.” 2. Understand Your Audience Deeply A common mistake creators make is assuming they know their audience. Successful YPD Media recipes are grounded in thorough audience research. Use analytics to understand your followers’ demographics, interests, and behavior. Monitor engagement patterns—what type of content gets likes, shares, or comments? Consider creating audience personas to guide your content strategy. Knowing your audience ensures your content resonates, making it more likely to be shared and engaged with. 3. Leverage Platform-Specific Strategies Different platforms reward different types of content. Optimizing your YPD Media recipe for each platform increases your chances of success. Instagram: Prioritize visually striking images and short-form videos with strong captions. YouTube: Focus on storytelling and structured video content with clear hooks. TikTok: Quick, engaging, and trend-driven content works best. LinkedIn: Educational, informative, and professional posts resonate here. Adapting your content format and style to the platform ensures better visibility and engagement. 4. Craft Captivating Hooks The first few seconds of your content often determine whether someone engages or scrolls past. A strong hook is crucial. Start with a question, bold statement, or surprising fact. Use attention-grabbing visuals or text overlays. Make it relatable and relevant to your audience’s interests. For example, a hook like “You won’t believe how this simple trick can boost your video engagement!” instantly sparks curiosity. 5. Use Storytelling Techniques Storytelling is a cornerstone of successful media recipes. People connect with stories more than with raw information. Begin with a relatable situation or problem. Build tension or curiosity. Offer a solution or takeaway at the end. Even a short social media video can follow a mini-story arc to make it memorable and shareable. 6. Optimize Visuals and Audio A YPD Media recipe isn’t complete without strong visuals and audio. Invest in quality images, graphics, and video editing. Use consistent branding colors and typography. Ensure audio is clear, and background music complements the content mood. High-quality visuals and audio not only improve engagement but also elevate your brand perception 7. Incorporate Interactive Elements Interactive content increases engagement and keeps audiences invested. Consider adding: Polls and quizzes Swipe-up links or calls-to-action Interactive sliders or comment prompts Interactivity makes your audience feel involved, increasing loyalty and shareability. 8. Experiment With Content Formats Variety is key to keeping your content fresh. YPD Media recipes encourage creators to experiment with formats: Carousel posts Short reels or TikToks Long-form videos or tutorials Infographics or data visualizations Testing multiple formats allows you to identify what resonates best with your audience and boosts overall engagement. 9. Schedule and Consistency Even the best content needs consistency to be effective. Develop a content calendar to plan posts ahead. Maintain a consistent posting frequency. Align posting times with when your audience is most active. Consistency helps build audience expectation and trust, which is essential for long-term engagement. 10. Measure and Refine No YPD Media recipe is complete without measurement and iteration. Track KPIs such as engagement rate, reach, and conversions. Analyze which content performs best and why. Adjust your strategy based on performance data. Continuous refinement ensures your media recipe evolves with audience trends and platform algorithms. Advanced YPD Media Tips For creators looking to take their content to the next level, these advanced tips can make a big difference. 1. Repurpose Content Creatively One piece of content can serve multiple purposes if repurposed wisely: Turn blog posts into short videos or reels. Convert videos into audiograms for podcasts. Create infographics from key insights. Repurposing maximizes the value of your content while

Best YPD Media Recipe Tips Every Creator Must Try About Read More »

Secret Zatarain's Fish Fry Recipe Restaurants Use

Secret Zatarain’s Fish Fry Recipe Restaurants Use

If you love crispy, golden, restaurant-style fried fish, you’re not alone. Many home cooks try to recreate that perfectly seasoned coating served at seafood spots and Southern kitchens. One popular shortcut is using Zatarain’s fish fry mixes, known for their bold flavor and crunchy texture. But what makes restaurant fried fish taste so much better than homemade versions? The answer often isn’t just the mix — it’s the technique. In this detailed guide, you’ll learn the secret Zatarain’s fish fry recipe restaurants use, along with expert tips, preparation tricks, and cooking methods that transform ordinary fried fish into something truly memorable. Whether you’re frying catfish, tilapia, cod, or whiting, this article breaks everything down in a simple, easy-to-follow way. Why Restaurant Fish Fry Tastes Better Before jumping into the recipe, it helps to understand why restaurant fried fish stands out. Restaurants focus on:  Proper fish preparation Balanced seasoning layers Moisture control Correct oil temperature Coating technique Frying timing Most home cooks miss at least one of these steps. Even small mistakes — like frying wet fish or overheating oil — can ruin texture and flavor. The good news? These secrets are easy to replicate once you know them. What Makes Zatarain’s Fish Fry Special The appeal of Zatarain’s fish fry products lies in their: Bold Cajun-style seasoning Perfectly textured cornmeal blend Reliable crispiness Versatility with many seafood types But restaurants rarely use the mix exactly as printed on the box. They enhance it. That’s where the “secret recipe” comes in. The Secret Restaurant-Style Zatarain’s Fish Fry Recipe This method mirrors techniques commonly used in busy kitchens. Ingredients 1 lb fresh fish fillets (catfish, tilapia, cod, etc.) 1 cup Zatarain’s Fish Fry Mix ½ cup fine cornmeal (extra crunch) 1 tsp garlic powder 1 tsp onion powder ½ tsp paprika ½ tsp black pepper ½ tsp cayenne (optional heat) 1 cup buttermilk (or milk + lemon juice) 1 egg (optional but recommended) Neutral frying oil (vegetable or peanut oil) Step 1 – Choose the Right Fish Restaurants select fish carefully. Freshness and texture matter more than anything. Best choices for frying:  Catfish – classic Southern flavor Tilapia – mild and tender Cod – flaky and light Whiting – delicate and crispy Haddock – firm yet soft inside Avoid fish that is:  Too thin (dries quickly) Too watery (coating falls off) Previously frozen without proper thawing Step 2 – The Most Important Secret: Dry the Fish This step alone changes everything. Fish naturally contains moisture. If you coat wet fillets, the breading becomes soggy and uneven. Restaurant trick: Pat fish completely dry with paper towels Let sit uncovered for 10–15 minutes Pat dry again Dry fish = crispy coating. Step 3 – Create a Flavor-Boosted Coating Instead of using only the mix, restaurants layer flavors. In a bowl, combine: Zatarain’s Fish Fry Mix Fine cornmeal Garlic powder Onion powder Paprika Black pepper Cayenne (optional) Why this works:  Cornmeal improves crunch Extra spices deepen flavor Coating tastes more “house-made” Step 4 – The Buttermilk Bath Technique Many restaurants soak fish briefly before coating. Mix: Buttermilk Egg (optional but helpful) Dip fish for 2–5 minutes. This step:  Adds moisture inside Helps breading stick Creates richer flavor But don’t soak too long. Fish should not become overly wet. Step 5 – The Double-Coating Trick For extra crunch: Dip fish in buttermilk mixture Coat in seasoned fish fry mix Lightly dip again Coat once more Result: thicker, crispier crust. Step 6 – Mastering Oil Temperature (Critical Step) Incorrect oil temperature is the #1 frying mistake at home. Ideal frying temperature: 350°F to 375°F (175°C to 190°C) Too cool → greasy fish Too hot → burnt outside, raw inside No thermometer? Drop a pinch of coating into oil:  Sizzles immediately → ready Sinks silently → too cold Burns instantly → too hot Step 7 – Fry Like a Restaurant Carefully lower fish into hot oil. Rules professionals follow: Do not overcrowd the pan Maintain steady heat Flip only once Fry until golden brown Typical cooking time: Thin fillets → 3–4 minutes per side Thick fillets → 4–6 minutes per side Step 8 – The Draining Secret Never place fried fish directly on plates. Restaurant method:  Drain on rack or paper towels Allow air circulation Prevent sogginess Steam ruins crispiness. Why This Recipe Works So Well This approach improves: Texture → crisp, crunchy coating Flavor → layered seasoning Moisture → juicy interior Appearance → golden finish Small professional techniques create dramatic improvements. Common Mistakes That Ruin Fried Fish Avoid these typical errors: 1. Frying Wet Fish Leads to mushy coating. 2. Skipping Seasoning Layers Mix alone may taste flat. 3. Wrong Oil Temperature Causes greasy or burnt fish. 4. Overcrowding the Pan Drops oil temperature quickly. 5. Excessive Flipping Breaks coating apart. Best Oils for Fish Frying Restaurants choose oils with high smoke points. Recommended:  Peanut oil – very stable Vegetable oil – neutral flavor Canola oil – light and clean Avoid:  Butter – burns fast Olive oil – strong flavor, low smoke point How to Get Extra Crispy Fish Every Time If you love crunch, try: Add extra fine cornmeal Use double-coating method Let coated fish rest 5 minutes before frying Maintain steady oil heat Resting helps coating adhere better. Flavor Variations Restaurants Often Use Spicy Cajun Style Add more cayenne and paprika. Lemon Pepper Fish Mix lemon pepper seasoning into coating. Garlic Lover’s Fry Boost garlic powder and add a pinch of salt. Mild & Kid-Friendly Reduce pepper and heat spices. Side Dishes That Pair Perfectly Restaurant fish fry meals shine with classic sides. Popular options:  French fries Coleslaw Hush puppies   Potato wedges Corn on the cob Mac and cheese The contrast of textures enhances the meal. Sauce Ideas That Elevate Flavor Great fried fish often includes dipping sauces. Easy favorites: Tartar sauce Spicy mayo Lemon butter sauce Cajun remoulade Garlic aioli Even simple sauces transform taste. Can You Use This Recipe for Other Seafood? Yes — the technique works beautifully with:  Shrimp Oyster

Secret Zatarain’s Fish Fry Recipe Restaurants Use Read More »

Zehnder's Cranberry Relish Recipe The Secret Holiday Favorite

Zehnder’s Cranberry Relish Recipe The Secret Holiday Favorite

The holidays are a time for warmth, joy, and unforgettable flavors that bring friends and family together. Among the many treats that grace our festive tables, cranberry relish holds a special place, and no recipe is as cherished as Zehnder’s Cranberry Relish. Known as a secret holiday favorite, this recipe combines tangy cranberries with just the right touch of sweetness and spice, creating a dish that perfectly complements roasted turkey, ham, or even simple winter sandwiches. In this article, we’ll dive deep into the magic behind Zehnder’s Cranberry Relish, its history, the ingredients, step-by-step instructions, tips for perfection, variations, and why it remains a must-have on every holiday table. The History Behind Zehnder’s Cranberry Relish Zehnder’s is not just a name; it’s a culinary tradition. Originally a small family restaurant, Zehnder’s gained fame for its homestyle cooking and innovative twists on classic recipes. Among these treasures, cranberry relish quickly became a holiday staple. Cranberries themselves have a long history in American cuisine, dating back to the early Native Americans section who used cranberries for both food and medicine. They were one of the few fruits that could survive harsh winters, making them ideal for holiday feasts. Over time, cranberry sauce evolved from a simple sweetened preserve into a more complex, flavorful relish that balances tartness with sweet undertones. Zehnder’s took this tradition and perfected it, creating a recipe that became the “secret favorite” at holiday gatherings. Today, families across the country try to replicate the distinctive flavor that Zehnder’s is known for, making it a sought-after recipe every festive season. What Makes Zehnder’s Cranberry Relish Special? Several factors make this recipe stand out: Balance of Flavors – The perfect cranberry relish must balance tartness, sweetness, and a hint of spice. Zehnder’s achieves this by combining fresh cranberries with carefully measured sugar and complementary flavorings. Texture – Unlike smooth cranberry sauces, a good relish has bite. Zehnder’s Cranberry Relish is slightly chunky, ensuring each spoonful has a burst of cranberry flavor. Versatility – While often paired with turkey, this relish also complements cheese platters, sandwiches, and roasted vegetables, making it an adaptable holiday condiment. Tradition and Authenticity – Using simple, high-quality ingredients and minimal processing preserves the authentic taste of fresh cranberries, a hallmark of Zehnder’s recipe. Ingredients You’ll Need One of the joys of making Zehnder’s Cranberry Relish is how simple the ingredients are. Here’s what you need for a classic version: Fresh cranberries (12 oz) – The star of the dish, cranberries provide natural tartness and vibrant color. Granulated sugar (1 cup) – Sweetens the cranberries and balances their tart flavor. Orange (1, zested and juiced) – Adds brightness and a subtle citrus note that enhances the cranberries. Apple (1, peeled and finely chopped) – Adds sweetness and texture to the relish. Pineapple (optional, ½ cup finely chopped) – Offers tropical sweetness and complements the tart cranberries. Cinnamon (½ tsp) – A pinch of warmth that evokes holiday nostalgia. Nutmeg (optional, a pinch) – Adds subtle aromatic depth. Chopped nuts (optional, ¼ cup) – Walnuts or pecans add crunch and a nutty flavor contrast. Each ingredient plays a crucial role in achieving the signature taste and texture that makes Zehnder’s Cranberry Relish a holiday favorite. Step-by-Step Instructions Creating Zehnder’s Cranberry Relish is simple, but following each step carefully ensures perfect results. Step 1: Prepare the Ingredients Rinse cranberries thoroughly and remove any stems or damaged berries. Zest and juice the orange, making sure to remove seeds. Peel and finely chop the apple. If using pineapple, chop it into small pieces as well. Step 2: Combine the Ingredients In a medium-sized mixing bowl, combine cranberries, sugar, orange juice, orange zest, chopped apple, and pineapple (if using). Sprinkle cinnamon and nutmeg over the mixture and stir until everything is evenly distributed. Step 3: Chill and Let Flavors Marry Cover the bowl with plastic wrap and refrigerate for at least 4–6 hours, preferably overnight. Chilling allows the sugar to macerate the cranberries, softening their tartness and enhancing flavor blending. Step 4: Add Optional Nuts Just before serving, fold in chopped nuts if desired. This adds texture and makes the relish visually appealing. Step 5: Serve Transfer the relish to a serving bowl. Pair it with your holiday main course or use as a festive sandwich spread. Tips for Perfect Cranberry Relish Even a simple recipe like Zehnder’s Cranberry Relish has secrets to making it exceptional: Use Fresh Cranberries – Frozen cranberries can work, but fresh ones provide a firmer texture and brighter flavor. Adjust Sweetness – Depending on the tartness of your cranberries, you may need more or less sugar. Taste and adjust before chilling. Experiment with Citrus – While orange is classic, a splash of lemon or lime juice can add a unique twist. Texture Matters – Chop ingredients uniformly for consistent texture. Some prefer a chunkier relish, while others like it finely minced. Prepare Ahead – This relish tastes even better when made a day in advance, allowing flavors to meld. Variations to Try Zehnder’s Cranberry Relish is versatile. Here are some popular variations: 1. Spiced Cranberry Relish Add cloves, allspice, or ginger for a more aromatic and spiced holiday flavor. 2. Cranberry-Orange-Pomegranate Include pomegranate seeds for a burst of sweetness and a festive look. The seeds also add crunch. 3. Cranberry-Apple-Walnut Focus on apples and toasted walnuts to add texture and a nutty contrast to the tart cranberries. 4. Tropical Cranberry Relish Combine pineapple, mango, and shredded coconut for a tropical holiday twist. 5. Low-Sugar Version Reduce sugar and add natural sweeteners like honey or maple syrup for a healthier option without sacrificing flavor. How to Store Zehnder’s Cranberry Relish Proper storage ensures your relish stays fresh and flavorful: Refrigerator – Keep in an airtight container for up to 1 week. Freezer – Freeze in a sealed container for up to 2 months. Thaw in the refrigerator before serving. Serving Tip – Let refrigerated relish sit at room temperature for 10–15 minutes before serving to enhance flavor. Why

Zehnder’s Cranberry Relish Recipe The Secret Holiday Favorite Read More »

Ultimate Zucchette Pasta Recipe for Pasta Lovers

Ultimate Zucchette Pasta Recipe for Pasta Lovers

If you love pasta and enjoy discovering new shapes, textures, and flavors, zucchette pasta deserves your attention. This charming pasta, inspired by the shape of tiny pumpkins, is not only visually appealing but also incredibly versatile. Its curved, ridged structure holds sauces beautifully, making every bite rich and satisfying. In this complete guide, you’ll learn everything you need to know about preparing the ultimate zucchette pasta recipe. From understanding the pasta itself to selecting the perfect ingredients, mastering cooking techniques, and exploring variations, this article covers it all in a simple, easy-to-follow way. Whether you’re a beginner or an experienced home cook, this recipe will help you create a dish that feels restaurant-worthy yet comforting and friendly. What Is Zucchette Pasta? Zucchette pasta is a decorative pasta shape resembling small pumpkins or squash. The name itself comes from the Italian word “zucca,” meaning pumpkin. The pasta’s unique shape is designed to capture sauces inside its curves and ridges, giving it both aesthetic charm and functional excellence. Unlike long pasta varieties, zucchette works particularly well with creamy, chunky, or vegetable-based sauces. Its structure allows ingredients to cling naturally, ensuring a balanced flavor in every forkful. Why Pasta Lovers Adore Zucchette Pasta fanatics appreciate zucchette for several reasons: Exceptional Sauce Holding Ability – The ridges and curves trap sauces effectively Elegant Presentation – Perfect for special dinners or gatherings Versatility – Compatible with a wide variety of ingredients Comforting Texture – Slightly firm yet tender when cooked properly This pasta shape transforms even simple sauces into memorable dishes. The Secret to an Ultimate Zucchette Pasta Dish Creating an unforgettable pasta dish is not about complexity. Instead, it relies on balance, freshness, and technique. The ultimate zucchette pasta recipe emphasizes harmony between the pasta, sauce, and supporting ingredients. Key elements include: Perfectly Cooked Pasta Flavorful Yet Balanced Sauce Fresh Aromatic Ingredients Proper Seasoning and Timing Let’s break everything down step by step. Ingredients for the Ultimate Zucchette Pasta Recipe A great pasta dish begins with quality ingredients. Simplicity works best, allowing the pasta shape and sauce to shine. Main Ingredients Zucchette pasta (dry or fresh) Olive oil Garlic (finely minced) Onion (optional but recommended) Fresh tomatoes or tomato puree Heavy cream or cooking cream Parmesan cheese (grated) Fresh basil or parsley Salt Black pepper Optional Flavor Enhancers Mushrooms Spinach Grilled chicken Shrimp Roasted vegetables Chili flakes These additions allow you to customize the dish according to preference. Step-by-Step Cooking Instructions Cooking zucchette pasta is straightforward, but precision matters. Follow these steps for the best results. Step 1: Boil the Pasta Properly Bring a large pot of water to a rolling boil. Pasta requires generous space to cook evenly. Important tips: Add enough salt to make the water taste slightly seasoned Stir occasionally to prevent sticking Cook until al dente (firm but cooked through) Overcooking destroys texture, so keep a close eye on timing. Step 2: Prepare the Sauce Base While the pasta cooks, begin the sauce. Heat olive oil in a pan Add minced garlic Optionally add chopped onion Cook gently until fragrant Avoid burning garlic, as it creates bitterness. Step 3: Build Rich Flavor Add tomatoes or puree to the pan. Let it simmer slowly. This stage develops depth and natural sweetness. Enhancement tips: Season lightly with salt and pepper Cook on medium-low heat Stir occasionally Patience improves flavor. Step 4: Add Creaminess Pour in cream to create a smooth, luxurious sauce. Stir thoroughly. This tomato mixture and cream delivers a balanced taste — not overly acidic, not too heavy. Step 5: Combine Pasta and Sauce Drain the pasta and add it directly into the sauce pan. Toss gently to coat evenly. The zucchette shape will capture the sauce beautifully. Step 6: Finish with Cheese and Herbs Sprinkle freshly grated Parmesan cheese and chopped herbs. This final touch elevates aroma and flavor dramatically. Why This Recipe Works So Well The beauty of this dish lies in contrast and balance. Cream softens tomato acidity Garlic adds warmth Cheese provides savory depth Herbs bring freshness Pasta shape enhances mouthfeel Together, these elements create a comforting yet elegant meal. Common Mistakes to Avoid Even simple recipes can go wrong. Avoid these frequent errors. Overcooking the Pasta Texture is critical. Mushy pasta ruins the dish’s integrity. Using Too Little Salt Pasta absorbs seasoning from water. Under-salted water leads to bland results. Rushing the Sauce Flavor develops through gentle simmering. Fast cooking reduces depth. Adding Too Much Cream Balance is key. Excess cream can overpower other ingredients. Delicious Variations to Try Zucchette pasta adapts wonderfully to different flavor profiles. Creamy Mushroom Zucchette Add sautéed mushrooms for earthiness and richness. This version feels deeply satisfying and comforting. Spinach and Garlic Zucchette Perfect for a lighter, fresher dish. Spinach adds color, nutrition, and subtle flavor. Chicken Zucchette Pasta Grilled or pan-seared chicken transforms the dish into a hearty main course. Seafood Zucchette Shrimp or light seafood pairs surprisingly well with creamy sauces. Roasted Vegetable Zucchette Ideal for a vibrant, colorful plate with layered textures. How to Enhance Flavor Like a Pro Professional-level pasta is about technique more than ingredients. Reserve Pasta Water A splash of starchy water improves sauce consistency and silkiness. Finish Cooking Pasta in Sauce Allowing pasta to absorb sauce enhances integration and taste. Use Fresh Herbs Fresh herbs drastically outperform dried ones in aroma and brightness. Serving Suggestions Presentation and pairing matter. Serve with warm garlic bread Add a fresh salad Garnish with extra cheese Sprinkle chili flakes for heat Simple accompaniments complete the meal without overpowering it. Storage and Reheating Tips Leftovers can remain delicious if handled properly. Refrigeration Store in an airtight container for up to two days. Reheating Warm gently with a splash of milk or cream to revive texture. Avoid high heat to prevent drying. Nutritional Perspective While pasta is often viewed as indulgent, balanced preparation makes it satisfying and reasonable. Carbohydrates provide energy Cream and cheese offer richness Vegetables increase nutritional value Portion control ensures balance Moderation and ingredient quality

Ultimate Zucchette Pasta Recipe for Pasta Lovers Read More »

The Secret Zippy's Macaroni Salad Recipe Everyone Loves

The Secret Zippy’s Macaroni Salad Recipe Everyone Loves

If you’ve ever had the pleasure of visiting Zippy’s, you know that their macaroni salad is legendary. Creamy, flavorful, and perfectly balanced, it’s a side dish that makes every plate feel like a special occasion. But did you know that you can recreate this beloved recipe right in your own kitchen? Today, we’re going to uncover the secret Zippy’s macaroni salad recipe everyone loves, breaking it down step by step, along with tips and tricks to make it taste just like the original. Why Zippy’s Macaroni Salad Is So Popular Zippy’s macaroni salad isn’t just any pasta salad. It’s a staple in Hawaiian plate lunches and has a fan following that spans generations. Its popularity comes from a few key factors: Creamy Texture: Every bite is smooth and indulgent without being overly heavy. Perfect Balance: The seasoning is just right—salty, slightly sweet, with a hint of tang from mayonnaise. Versatility: It pairs beautifully with burgers, fried chicken, or grilled fish. Nostalgia: For many, it’s a taste of home or a memory from a trip to Hawaii. Understanding why it’s so loved helps us appreciate what we need to focus on when making it at home: texture, flavor, and freshness. Ingredients for the Secret Zippy’s Macaroni Salad Before you start, gather the following ingredients. These are the conditions for recreating the creamy, delicious flavor that Zippy’s is famous for: Macaroni pasta: 1 pound (regular elbow macaroni works best) Mayonnaise: 1 cup (real mayo, not light) Milk: 1/4 cup (helps loosen the mayo for a creamier texture) Sugar: 1 teaspoon (adds a subtle sweetness) Salt: 1/2 teaspoon (enhances all flavors) Black pepper: 1/4 teaspoon (freshly ground gives the best flavor) Carrots: 1/4 cup, finely grated (adds color and mild sweetness) Onion: 1/4 cup, finely chopped (optional, but adds a gentle bite) These ingredients are simple, but the magic is in the technique. Step-by-Step Guide to Making Zippy’s Macaroni Salad Step 1: Cook the Macaroni Perfectly Start by boiling a large pot of salted water. Add the macaroni and cook it al dente, usually 7-8 minutes. Overcooked macaroni will make your salad mushy, so timing is key. Once cooked, drain and rinse under cold water to stop the cooking process. This also prevents the pasta from sticking together. Step 2: Prepare the Dressing While the pasta cools, combine mayonnaise, milk, sugar, salt, and pepper in a large bowl. Whisk until smooth. The milk is essential—it makes the dressing creamy without being heavy. Taste as you go and adjust salt or sugar according to your preference. Step 3: Mix in Vegetables Add the finely grated carrots and chopped onions to the dressing. This step gives the salad a subtle sweetness and freshness that balances the richness of the mayonnaise. Some people like to add a small amount of celery for crunch, but this is optional. Step 4: Combine Pasta and Dressing Gently fold the cooked macaroni into the dressing mixture. Make sure every piece of pasta is coated evenly. At this point, resist the urge to overmix, as it can break the pasta and make the salad look mushy. Step 5: Chill Before Serving Transfer the macaroni salad to a container and cover it. Refrigerate for at least 2 hours, preferably overnight. Chilling allows the flavors to meld together, making every bite more flavorful. Step 6: Final Touches Before serving, give the salad a gentle stir. Taste again and add a little more salt or pepper if needed. Some people like to sprinkle a little paprika on top for color, but this is optional. Tips and Tricks for the Perfect Zippy’s Macaroni Salad Even with the right ingredients, small details make a huge difference. Here’s how to ensure your macaroni salad is as close as possible to Zippy’s: Use real mayonnaise: It’s the backbone of the salad’s creamy texture. Don’t skip the milk: It keeps the salad from being too thick or heavy. Rinse the pasta: This prevents starch buildup and keeps the salad smooth. Grate carrots finely: Large chunks can disrupt the creaminess. Chill it well: Flavors deepen with time. This isn’t a salad to serve immediately. Gentle mixing: Overmixing breaks the pasta and turns the salad gluey. Following these small tips will elevate your macaroni salad from good to restaurant-quality. Variations You Can Try While the classic Zippy’s macaroni salad is perfect as is, experimenting can be fun. Here are a few popular variations: Hawaiian Twist: Add diced pineapple for a sweet, tropical flavor. Extra Crunch: Toss in finely chopped celery or bell pepper. Egg Addition: Hard-boiled eggs, chopped, add protein and creaminess. Spicy Kick: A pinch of cayenne pepper or paprika can add subtle heat. Keep in mind that if you want to stay true to the original, simplicity is key. Most people fall in love with the salad because of its classic creamy flavor. Why Making This Recipe at Home Is Worth It There are plenty of store-bought macaroni salads, but none quite match the freshness and flavor of a homemade version. By making Zippy’s macaroni salad at home: You control the ingredients—no preservatives or unnecessary additives. You can adjust flavors to suit your family’s taste. It’s cost-effective compared to buying ready-made salads. You get to enjoy a slice of Hawaiian culinary culture wherever you are. Plus, homemade macaroni salad often tastes even better than restaurant versions because it’s made with love and care. Serving Suggestions for Zippy’s Macaroni Salad This salad is versatile and pairs wonderfully with a variety of dishes: Plate lunches: Traditionally served with rice and meat such as fried chicken, teriyaki beef, or fish. Barbecues: A creamy side that balances smoky flavors perfectly. Sandwiches: Use as a filling or side for picnic sandwiches. Potlucks: Always a crowd-pleaser that disappears fast. The cool, creamy texture complements rich or grilled dishes perfectly, making it a staple for gatherings and family meals. Common Mistakes to Avoid Even seasoned cooks can make mistakes when attempting macaroni salad. Here’s what to watch out for: Overcooking pasta: Leads to mushy, unappealing

The Secret Zippy’s Macaroni Salad Recipe Everyone Loves Read More »

Best Zigeuner Schnitzel Recipe You Must Try Now

Best Zigeuner Schnitzel Recipe You Must Try Now

If you love crispy schnitzel and bold, savory sauces, you are going to enjoy this classic Zigeuner Schnitzel recipe. This dish is famous for its perfectly pan-fried cutlet topped with a rich bell pepper and onion sauce that is slightly tangy, slightly sweet, and deeply satisfying. It is comfort food at its best — simple ingredients, big flavors, and a result that tastes like something from a traditional European kitchen. This guide will walk you through everything you need to know: ingredients, step-by-step order, cooking tips, variations, common mistakes, serving ideas, and storage advice. Even if you have never made schnitzel before, this easy recipe will help you succeed. What Is Zigeuner Schnitzel? Zigeuner Schnitzel is a popular schnitzel variation traditionally associated with German and Central European cuisine. The word “Zigeuner” historically referred to a style of sauce rather than a specific ingredient. The sauce is the real highlight — a colorful mixture of bell peppers, onions, tomatoes, and spices that pairs beautifully with the crispy cutlet. The dish is known for: A golden, crunchy schnitzel A bold, slightly smoky pepper sauce Simple pantry ingredients Restaurant-quality taste at home While there are many regional interpretations, the core concept remains the same: crispy meat plus a vibrant vegetable sauce. Why You Should Try This Recipe There are many schnitzel recipes, but Zigeuner Schnitzel stands out for several reasons:  Big Flavor – The pepper sauce transforms a basic schnitzel into something exciting. Easy Ingredients – No rare items required. Perfect for Dinner – Works well for family meals or guests. Customizable – You can easily adjust spice levels. If you enjoy dishes that feel rich but are surprisingly easy to cook, this recipe is ideal. Ingredients You Will Need For the Schnitzel 2 large pork cutlets or chicken breasts (thinly pounded) Salt to taste Black pepper to taste 1 cup all-purpose flour 2 eggs (beaten) 1–1½ cups breadcrumbs Oil or butter for frying For the Zigeuner Sauce 2 tablespoons oil or butter 1 large onion (thinly sliced) 1 red bell pepper (sliced) 1 green bell pepper (sliced) 2 cloves garlic (minced) 2 medium tomatoes (chopped) or canned tomatoes 1 tablespoon tomato paste ½ teaspoon paprika Salt and pepper to taste Optional chili flakes for heat Splash of water or broth These ingredients are flexible. Small substitutions will not ruin the dish. Preparing the Schnitzel The foundation of a great Zigeuner Schnitzel is a properly prepared cutlet. 1. Pound the Meat Place the cutlets between plastic wrap and gently pound until thin. Thin meat cooks faster and stays tender. Tip: Aim for even thickness. Uneven pieces cook unevenly. 2. Season Well Sprinkle salt and black pepper on both sides. Proper seasoning ensures the schnitzel itself has flavor even before adding sauce. 3. Prepare Breading Station Set up three bowls: Flour Beaten eggs Breadcrumbs Dip each cutlet: Flour → Egg → Breadcrumbs Press breadcrumbs lightly so they adhere. 4. Fry Until Golden Heat oil or butter in a pan over medium heat. Fry schnitzel until both sides are golden brown. Important: Avoid overfill the pan. Remove and rest on a paper towel. Making the Zigeuner Sauce The sauce is what makes this dish memorable. 1. Sauté the Onion Heat oil or butter. Cook sliced onions until soft and slightly golden. 2. Add Bell Peppers Stir in red and green bell peppers. Cook until tender but not mushy. 3. Add Garlic Cook briefly. Garlic burns quickly, so keep heat moderate. 4. Add Tomatoes and Tomato Paste This creates a body and richness. 5. Season and Simmer Add paprika, salt, pepper, and optional chili flakes. Add a small splash of water or broth and simmer until slightly thickened. The sauce should be glossy, aromatic, and slightly chunky. Combining Everything Place schnitzel on serving plates and spoon warm sauce generously over the top. Serve immediately for best texture. Expert Cooking Tips Use Thin Cutlets Thin meat ensures crisp coating and juicy interior. Maintain Oil Temperature Too hot → Burned coating Too cold → Greasy schnitzel Medium heat works best. Do Not Skip Resting Resting keeps coating crisp and prevents sogginess. Sauce Consistency Matters Too watery → Weak flavor Too thick → Heavy texture Aim for spoonable richness. Common Mistakes to Avoid Skipping Meat Pounding – Results in uneven cooking Low Heat Frying – Makes schnitzel oily Overcooking Sauce – Leads to mushy peppers Underseasoning – Flat taste Small details greatly affect final results. Delicious Variations Chicken Zigeuner Schnitzel Perfect if you prefer lighter meat. Chicken absorbs sauce beautifully. Beef Version Richer, heartier, and deeply satisfying. Spicy Style Add chili flakes or hot paprika for extra heat. Creamy Sauce Twist Stir in a small splash of cream for a smoother finish. Best Side Dishes Zigeuner Schnitzel pairs well with many sides: French fries Mashed potatoes Rice Buttered noodles Fresh salad Steamed vegetables Choose based on mood and occasion How to Store Leftovers Refrigeration Store schnitzel and sauce separately if possible. Keeps the coating crisp. Reheating Use pan or oven rather than a microwave for the best texture. Freezing Sauce freezes better than schnitzel. Breaded cutlets may lose crunch. Final Thoughts If you are searching for a satisfying, crowd-pleasing meal, this Best Zigeuner Schnitzel Recipe You Must Try Now is an excellent choice. It is rich, comforting, and surprisingly easy to prepare. Whether you cook for family, guests, or simply yourself, this dish delivers both flavor and visual appeal. Once you master the technique, you can experiment with endless variations. That is the beauty of classic recipes — simple foundations, infinite possibilities. Happy cooking! FAQS

Best Zigeuner Schnitzel Recipe You Must Try Now Read More »

Scroll to Top